Connect your AI tool
Add Angareion to your AI tool in a few minutes. Angareion runs a hosted server your assistant connects to — no API key to paste, no software to install. You approve the connection once from your browser, and Angareion's memory tools show up inside your assistant.
Everything below uses one address — the Angareion MCP server URL:
https://mcp.angareion.dev/mcp
You'll paste that into your AI tool's connector settings, then approve access. Jump to your tool:
- Claude (desktop & web)
- Claude Code
- ChatGPT
- Codex
- Gemini
- Perplexity Enterprise
- Joule Work Desktop
- Any other MCP client
When you connect, a browser window opens and asks you to approve access. You sign in with your Angareion username and password — your AI tool never sees them. You can revoke a connection at any time from your Angareion dashboard.
Claude
Works with the Claude desktop app and Claude on the web.
-
Open Claude. Click your account name and go to Settings.
-
Go to Connectors → Add → Add custom connector.
-
In the dialog, set the Name to
Angareionand the Remote MCP server URL to:https://mcp.angareion.dev/mcp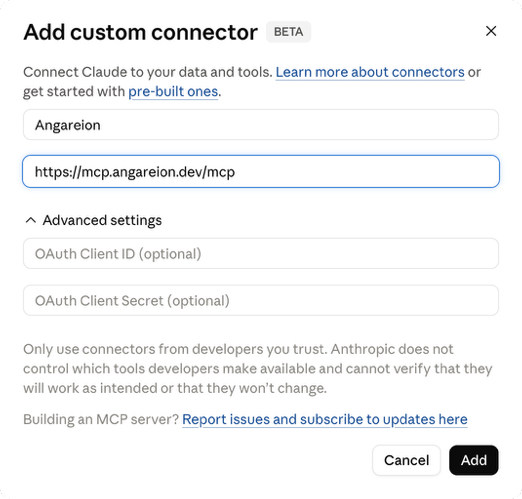
-
Click Add.
-
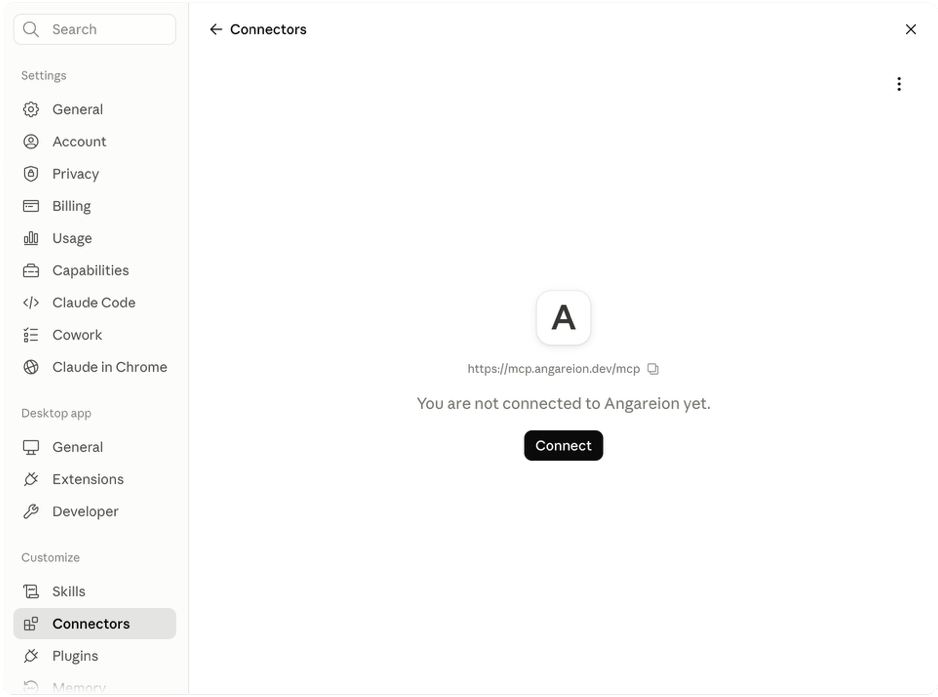
Click Connect. A browser window opens to Angareion.
-
If prompted, log in with your Angareion username and password.
-
Click Approve on the consent screen.
-
Return to Claude — Angareion tools are now available in your conversation.
Claude Code
These steps configure local Claude Code sessions. Claude Code on the web does not use MCP servers added by the local CLI.
-
In a terminal, register Angareion at user scope so it is available in every local project:
claude mcp add --transport http --scope user angareion https://mcp.angareion.dev/mcp -
Start or restart Claude Code and enter
/mcp. -
Select angareion, then choose Authenticate when prompted. Claude Code opens your browser. If it cannot, copy the authorization URL it displays into a browser on this computer.
-
Log in to Angareion if prompted, name a new agent or choose an existing one, and click Approve.
-
Return to Claude Code and enter
/mcpagain. Angareion should show as connected with its tools listed.
See Anthropic's Claude Code MCP documentation.
ChatGPT
Use ChatGPT on the web. Custom developer-mode MCP apps are unavailable on mobile and can be restricted by workspace policy. OpenAI's current developer documentation lists Plus, Pro, Business, Enterprise, and Education accounts as eligible.
-
Open Settings → Security and login and turn on Developer mode.
-
Open Plugins from the ChatGPT sidebar, then click + to create a developer-mode app.
Managed-workspace rolloutIf your managed workspace still shows OpenAI's earlier UI, use Settings or Workspace settings → Apps → Create. Your administrator may need to enable developer mode or grant you permission first.
-
Create the app with these settings:
- Name:
Angareion - Protocol:
Streaming HTTP - Authentication:
OAuth - MCP server URL:
https://mcp.angareion.dev/mcp - Name:
-
Leave static OAuth credentials blank. Choose Dynamic Client Registration (DCR) if the form asks how to register the client; Angareion publishes OAuth discovery metadata and registers ChatGPT automatically.
-
Create the app. If your UI shows Scan Tools, click it before Create. When ChatGPT opens Angareion, log in, name a new agent or choose an existing one, and click Approve.
-
Start a new chat. From the composer + menu choose Developer mode, then select Angareion for the conversation.
-
Ask ChatGPT to use an Angareion tool. ChatGPT may ask you to confirm tools that create or change data.
See OpenAI's current ChatGPT developer-mode guide and workspace rollout and permissions guide.
Codex
Codex is a first-class Angareion Connect target. The ChatGPT desktop app, Codex IDE extension, and Codex CLI share the same user-level MCP configuration. This is distinct from ChatGPT on the web.
-
In ChatGPT desktop, open Settings → MCP servers → Add server. Set the name to
Angareion, choose Streamable HTTP, and enter:https://mcp.angareion.dev/mcpSave, then select Restart. If the server shows Authenticate, select it. If that control is absent, use the explicit login command below.
-
Or, register Angareion from a terminal. Skip this if you already added it in desktop settings:
codex mcp add angareion --url https://mcp.angareion.dev/mcp -
Start the OAuth flow:
codex mcp login angareion -
In ChatGPT desktop on macOS,
codexmay not be on yourPATH. Use its bundled binary instead (again, omit the first line if the server is already configured):/Applications/ChatGPT.app/Contents/Resources/codex mcp add angareion --url https://mcp.angareion.dev/mcp/Applications/ChatGPT.app/Contents/Resources/codex mcp login angareion -
In the browser, log in to Angareion if prompted, name a new agent or choose an existing one, and click Approve.
-
Return to Codex and start a new task. In the CLI, enter
/mcpto confirm Angareion is connected. The app and IDE extension read the same~/.codex/config.tomlconfiguration. A missing Authenticate button orAuth: Unknownlabel is not a reliable failure signal—invoke an Angareion tool to verify the connection. -
To add reusable memory, knowledge, handoff, specialist, and output workflows, choose one of these paths:
- Recommended: install the signed Codex plugin bundle from the matching
ang-v*release. It packages the skills and MCP server together. Do not combine it with a manually configured server of the same name. - Manual MCP already configured: run
ang install skills --target codexfor standalone skills in~/.agents/skills. This does not configure or authenticate the MCP server. If you need to installangfirst, runcurl -fsSL https://github.com/angareion/releases/releases/latest/download/install.sh | ANG_SKIP_SKILLS=1 sh, then theang install skills --target codexcommand above — the plain installer otherwise also registers the MCP connection for you (idempotent: it's a no-op if you already added it above).
- Recommended: install the signed Codex plugin bundle from the matching
See OpenAI's Codex MCP documentation and Skills documentation.
Gemini
Google documents two custom MCP clients: Gemini CLI for self-service use and Gemini Enterprise for administrator-managed deployment. The consumer Gemini web app and Google AI Studio do not use this setup flow.
Gemini CLI
-
Register Angareion at user scope so it is available in every Gemini CLI project:
gemini mcp add --transport http --scope user angareion https://mcp.angareion.dev/mcp -
Start Gemini CLI and enter
/mcp auth angareion. -
Complete the browser flow on the same computer. OAuth requires a local browser and callback, so it will not work from a headless container or an SSH session without browser forwarding.
-
Log in to Angareion, name a new agent or choose an existing one, and click Approve.
-
Return to Gemini CLI and enter
/mcp. Angareion should show as connected with its tools listed.
See Google's Gemini CLI MCP documentation.
Gemini Enterprise
Gemini Enterprise custom MCP data stores are a Preview feature configured by a Google Cloud administrator.
-
Complete Google's prerequisites:
- Override the organization policy that blocks custom MCP data stores.
- Allow the
mcp.angareion.devandangareion.devFQDNs for egress. - If project enforcement applies, add
custom_mcpto the allowed data sources. - Grant the administrator Discovery Engine Editor (
roles/discoveryengine.editor).
-
Email support@angareion.dev for a Gemini Enterprise OAuth Client ID registered to Google's fixed redirect URI. Angareion uses public-client PKCE for this flow, so you will not receive or enter a Client Secret.
https://vertexaisearch.cloud.google.com/oauth-redirect -
In Google Cloud, open Gemini Enterprise → Data stores → Create data store.
-
Search for Custom MCP Server, click Add MCP server, and choose OAuth 2.0.
-
Enter these values, add the Client ID from Angareion support, turn on Enable PKCE Support, and leave Client Secret empty:
MCP Server URL: https://mcp.angareion.dev/mcpAuthorization URL: https://angareion.dev/authorizeToken URL: https://angareion.dev/tokenScopes: mcp -
Click Verify Auth. Log in to Angareion, name a new agent or choose an existing one, click Approve, then return to Google Cloud and click Continue.
-
Enter a clear MCP server description, continue, choose the connector multi-region, set the data connector name to
Angareion, and click Create. Wait for its state to become Active. -
Open the new data store and choose Actions → Reload custom actions. Reauthenticate if asked, select the Angareion actions users may call, and click Enable actions.
-
Attach the data store to the Gemini Enterprise app or agent your users will open.
See Google's Gemini Enterprise custom MCP documentation.
Perplexity Enterprise
Remote custom connectors are a Perplexity Enterprise feature. Organization members can add one only when an administrator enables custom connectors.
-
If you are not an administrator, ask one to enable Allow members to add custom connectors under the Enterprise connector permissions. An administrator can instead create and share an organization-wide connector.
-
For an individual connector, open Account settings → Connectors.
-
Click + Custom connector, then select Remote.
-
Enter these settings:
- Name:
Angareion - Authentication:
OAuth 2.0 - Transport:
Streamable HTTP - MCP Server URL:
https://mcp.angareion.dev/mcp - Name:
-
Do not enter a Client ID or Client Secret. Angareion supports OAuth discovery and Dynamic Client Registration, so Perplexity can register automatically.
-
Check the custom-connector risk acknowledgement, then click Add.
-
Back on the Connectors screen, click the Angareion connector card to authenticate and enable it.
-
Log in to Angareion, name a new agent or choose an existing one, and click Approve.
-
Return to Perplexity and confirm the connector is enabled. You can now invoke Angareion from a Perplexity prompt.
See Perplexity's custom remote connector documentation.
Joule Work Desktop
Joule Work Desktop can import the generated Angareion SKILL.md adapters. Their import format is based on valid early-access examples, but end-to-end MCP execution is not yet marked verified because current workspace policy blocks custom MCP connections.
-
Launch Joule Work Desktop. Click Extensions to open the extensions panel.

-
Click + New → Add Connector.

-
Set the Name to
Angareionand paste the MCP URL into the URL field:https://mcp.angareion.dev/mcp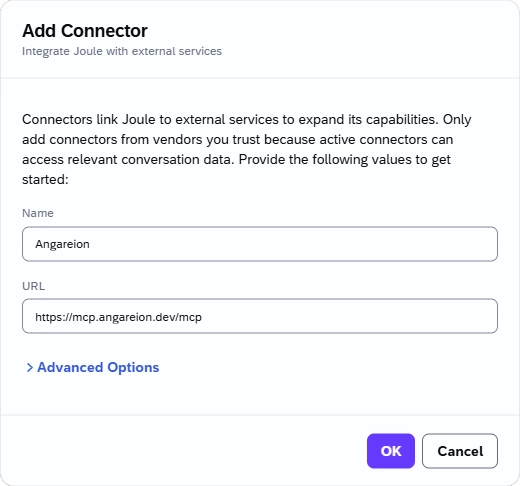
-
Click OK.
-
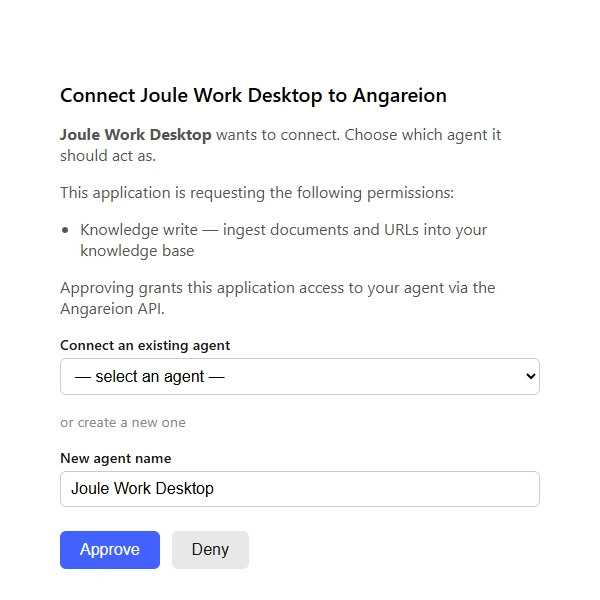
Joule opens a browser window to Angareion. If prompted, log in with your Angareion username and password.
-
Name your agent (or choose an existing one), then click Approve on the consent screen. Agent memories can be shared across sessions and LLMs.
-
Return to Joule — Angareion tools are now available in your workspace.
Add reusable Angareion workflows
The connector exposes tools. Angareion Skills add repeatable instructions for using those tools safely and consistently across memory, knowledge, handoff, specialist, and output tasks.
- Codex: install the Angareion plugin bundle published with each
ang-v*release. It packages skills and the remote MCP dependency together; do not combine it with a manually configured server of the same name. A manually configured Codex MCP server can instead useang install skills --target codexfor standalone skills only. - ChatGPT on the web: use the developer-mode MCP app. It does not read local
anginstalls or local Codex plugins; reusable workflows require an Angareion plugin distributed through a ChatGPT marketplace. - Claude and Perplexity: download and extract the matching platform pack, then upload each included per-skill ZIP separately. Every inner ZIP has
SKILL.mdat its root. - Claude Code, Gemini CLI, Cursor, Windsurf, Cline, and GitHub Copilot: run
ang install skills --target <target>. Plainang install skillscontinues to target Claude Code.- Don't have
angyet? Install it — and the skill pack, recall hook, and MCP connection for your target client — with one command on Linux, macOS, or Git Bash (MINGW64) on Windows:curl -fsSL https://github.com/angareion/releases/releases/latest/download/install.sh | sh. Native Windowscmd.exe/ PowerShell download the binary manually — see the CLI README.
- Don't have
- Joule Work Desktop: download the Joule pack and import the rendered
SKILL.mdfiles. MCP execution remains unverified while workspace policy blocks the connector. - Gemini Enterprise: use the connector without an MCP-backed Skill until its Skills runtime permits custom MCP tools.
Cursor, Windsurf, Cline, and GitHub Copilot are compatibility clients; they do not receive dedicated Angareion Connect cards.
Any other MCP client
This URL-only flow works only in clients that support remote MCP over Streamable HTTP and OAuth 2.1. A client that supports only local stdio servers must use the Advanced: Local Binary option on the Angareion Connect page.
- Open the client's custom connector or MCP server settings. Add a server named
Angareionwith this URL:https://mcp.angareion.dev/mcp - Choose Streamable HTTP (sometimes labelled HTTP or Streaming HTTP) and OAuth 2.0/2.1 if those fields are shown. Do not choose legacy SSE or API-key authentication.
- Use automatic OAuth discovery and Dynamic Client Registration when supported. No Angareion API key, Client ID, or Client Secret is needed.
- Start the client's Connect, Authenticate, or first-tool-call flow.
- Log in to Angareion, name a new agent or choose an existing one, and click Approve.
- Return to the client and confirm Angareion is connected and its tools are visible.
If the client requires pre-registered credentials, cannot perform PKCE, or never opens an OAuth flow, it is not compatible with the URL-only setup. See the MCP authorization specification for the protocol requirements.
Confirm it worked
Once you've approved the connection, you can confirm Angareion received it:
- Open your Angareion dashboard and go to Connect.
- Pick the agent you want to verify against and click Check connection.
- When Angareion sees the live session, it shows Connected · Active with your tool's name.
You can also just try asking your assistant to use a memory tool (below) — if it responds, you're connected.
Try asking
Once connected, your assistant can reach Angareion in plain language. A few things to try:
- "Remember that our Q3 launch messaging pillars are speed, trust, and simplicity."
- "What did we decide about pricing last week?"
- "Search my Angareion memory for the onboarding checklist."
- "Save this thread so I can pick it up in another assistant later."
What Angareion adds to your assistant
Connecting gives your assistant a set of memory and knowledge tools. They fall into two groups:
Recall — reads your memory and knowledge (safe, read-only):
| What it does | Tool |
|---|---|
| Search your memories | memory_search |
| Browse and open memories | memory_list, memory_get |
| Search and fetch across everything | search, fetch |
| List documents & knowledge sources | document_list, knowledge_sources_list |
| List available specialists | specialist_list |
| See saved session handoffs | handoff_list |
| Find saved work products | output_list, output_get, output_search |
Capture — writes to your memory and knowledge:
| What it does | Tool |
|---|---|
| Save a new memory | memory_create |
| Edit or remove a memory | memory_update, memory_delete |
| Link memories together | memory_relate |
| Promote a memory to your team | memory_promote |
| Add a document or a web page | document_ingest, document_ingest_url |
| Save / resume a session handoff | handoff_save, handoff_resume |
| Load a specialist | specialist_load |
| Save or email a complete work product | output_save, output_email |
The exact tools available can vary with your plan and your organization's settings.
Troubleshooting
My assistant doesn't see any Angareion tools
The connection probably wasn't approved. Reopen your tool's connector settings, remove the Angareion connector, and add it again — this time make sure you complete the browser approval step (Approve / Allow). Disconnecting and reconnecting resolves most connection issues.
The approval window never opened, or nothing happened after I added the URL
Client behavior differs. In Codex desktop, run codex mcp login angareion; on macOS, if codex is not on your PATH, run /Applications/ChatGPT.app/Contents/Resources/codex mcp login angareion in Terminal. For other tools, the approval window may open on the first tool call—ask your assistant to do something with Angareion (for example, "search my Angareion memory"). In every case, check that the URL is exactly https://mcp.angareion.dev/mcp with no trailing spaces.
"Check connection" in the dashboard times out
The dashboard waits about two minutes for a live session. Make sure you finished the Approve step in your AI tool, then click Try again. If you have no agents yet, register one first — the check needs an agent to verify against.
I don't see Developer mode or the + button in ChatGPT
Use ChatGPT on the web and confirm your account is eligible. A managed workspace can restrict developer mode and custom app creation; ask the workspace administrator to grant access. Some managed workspaces still use the older Apps wording instead of Plugins.
Gemini Enterprise asks for a client secret
Turn on Enable PKCE Support and leave Client Secret empty. Email support@angareion.dev for the public OAuth Client ID registered to Gemini Enterprise's fixed redirect URI.
I don't see + Custom connector in Perplexity
Remote custom connectors require Perplexity Enterprise, and administrators disable member-created connectors by default. Ask your administrator to enable Allow members to add custom connectors or to create an organization-wide Angareion connector.
My tool isn't listed above
Any tool that supports remote MCP servers over OAuth works — follow the Any other MCP client steps. If your tool only supports a local (stdio) connection, use the Advanced: Local Binary option on the dashboard's Connect page instead.
Next step
Connected? Head to the Quickstart to capture your first memory and recall it in a chat.